Lasers, Python, and SVG
Manipulating SVG Files via Python for Laser Cutting on the Glowforge
Background
I like to think I have pretty normal hobbies; I like to to run, hike, tinker around on my skis, and cut things with a hobbyist grade CNC laser. Well maybe some of them only appear normal to me because of the years I’ve spent on various manufacturing floors. A laser is an amazing tool that has enable me to quickly and easily create countless projects ranging from a simple finger joint box, a leather wallet, and a topographical map of Seattle. Nevertheless, any tool has their drawbacks; for me this has been preparing the files for the laser.


Let me give you a little background so you can better understand the issues with my workflow. About two years ago I purchase a the Glowforge which is a desktop CNC laser that brings the precision and accuracy of industrial machines into the home. It can cut and engrave various materials including wood, acrylic, leather, cardboard, and other assorted organic materials. It is mesmerizing to watch the laser at work and at times it feel like magic.

That being said it is not magic, the Glowforge has a web application which reads in raster and vector images. The images are interpreted as cut or engraving paths based on their fill, stroke, color and image type. Various settings can then be adjusted on the web application before sending the file to the cloud to generate the required machine code. This machine code is what the laser itself reads to actually cut and engrave the work piece. A majority of the heavy lifting typically associated with generating machine code is handled by this Glowforge, the web application, and the supporting cloud but this workflow can be streamlined by starting with a well formatted input file.
The Glowforge can process various file types including JPG, PNG, SVG, and PDF but I often find SVG files the easiest to work with as they are well, scalable. In addition, they are easy to edit using various programs such as Adobe Illustrator and Inkscape. You can directly create your files in these programs but I often design three dimensional assemblies as opposed to two dimensional designs. These kind of projects lend themselves to a 3D CAD program such as Autodesk Fusion 360. After design a part in Fusion 360 the part can be export to a SVG using a the add-on Shaper Utilities. The Shaper Utilities was created for the Shaper Origin which is a hand held CNC router. It is another amazing tool worth checking out.
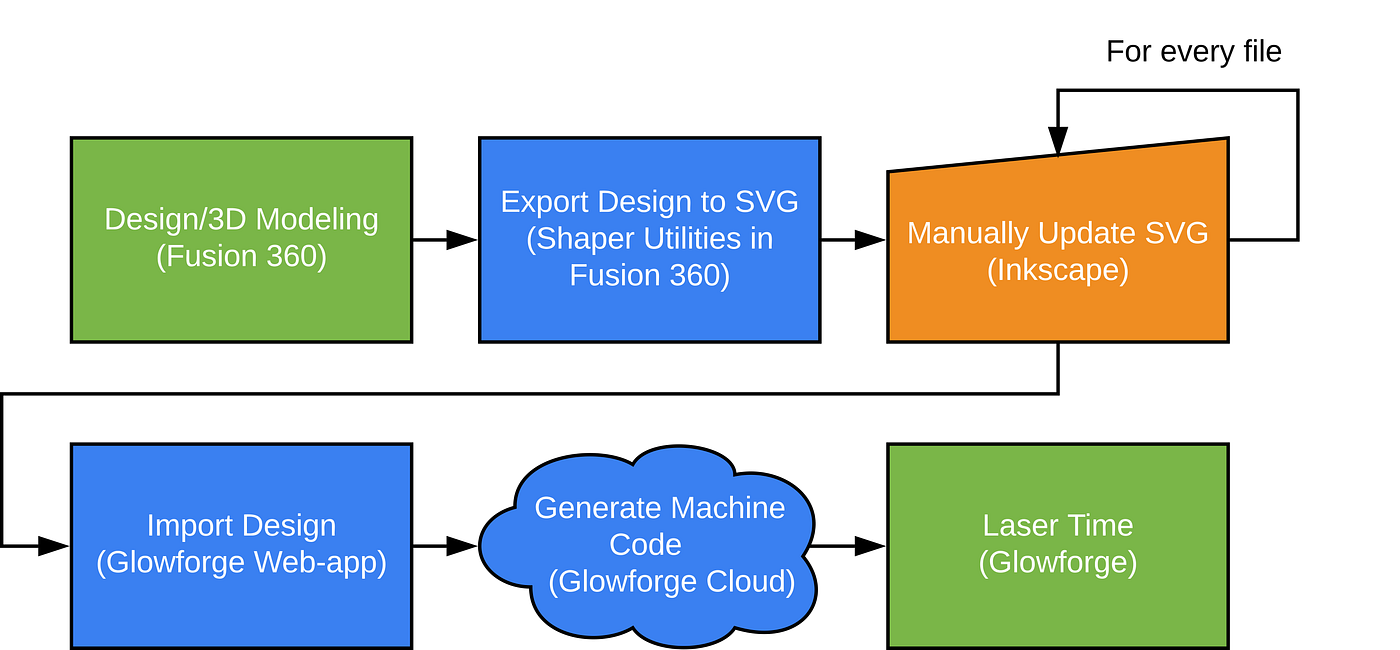
Unfortunately the format of the SVG created by the Shaper Utilities is not the exact format the Glowforge web application expects. The file can be manually updated in Inkscape to prepare it for used on the Glowforge but this is tedious and repetitive work which quickly adds up when multiple parts are being worked. From this point the SVG can be sent to the Glowforge web application. The flowchart in Figure 3 describes the current workflow.
Ideally, manual input would only be spent on the fun parts of the workflow; design/3D modeling and laser time. The “Manually Update SVG” step can be eliminated via scripting which will save time and restore a bit of sanity. The scripting is made easier due to the fact that SVG files are human readable files. SVG files are written in XML which is very similar to HTML since they are both created by the World Wide Web Consortium. I know a stated that pretty casually but it blew my mind when I realized SVGs were human readable. I had never questioned that fact instead assuming SVG files were binary like most images.
Manipulate SVG via Python Script
To develop a SVG laser preparation script a simple square part with a hole through the center will be used. Exporting this from Fusion 360 via the Shaper Utilities produces the SVG in the below image.

The as-exported SVG has an external path fill of black with no stroke color and an internal path fill of white and no stroke color. The Glowforge web application assumes that path fills are engraved and path strokes are cut. Therefore using this file as-is will result is a burnt black square that is not even cut out of the workpiece. Since this is not the desire the SVG shall be updated per Figure 4. In addition, all internal paths shall be grouped with one another and that group shall be nested in another group with the external path; this will ease any future manual manipulation.
Opening the as-exported SVG in a text editor a custom path tag created by the Shaper Utilities called shaper:pathType is found. This tag specifies if the path is an external or internal path. This is convenient as it is exactly how I want to sort and group the desired SVG.
<path d="M0.635,1.27 a0.635,0.635 0 1,1 1.27,0 a0.635,0.635 0 1,1 -1.27,0z" fill="rgb(255,255,255)" shaper:cutDepth="0" shaper:pathType="interior" stroke="rgb(0,0,0)" transform="matrix(1,0,0,-1,-0,2.5400001)" vector-effect="non-scaling-stroke" />Figure 5: As-Exported.svg Excerpt
From here a script an be written which reads in the as-exported SVG, parse through it looking for the for the shaper:pathType tag, then update the update the fill and stroke tags before finally grouping paths appropriately using <g> tags. I wrote the below script in python but any language would work.
# Define user inputs, these must be strings in svg file readable format
exterior_fill_color = 'none'
exterior_stroke_color = 'rgb(0,0,0)'
exterior_stroke_width = '0.005in'interior_fill_color = 'none'
interior_stroke_color = 'rgb(255,0,0)'
interior_stroke_width = '0.005in'# User defined Inkscape preferences. I don't know what all these do so they are just copied from a .svg file save in Inkscape. If you do not have any preferences you can replace this with False
inkscape_preferences = '<sodipodi:namedview pagecolor="#ffffff" bordercolor="#666666" borderopacity="1" objecttolerance="10" gridtolerance="10" guidetolerance="10" inkscape:pageopacity="0" showgrid="false" inkscape:window-maximized="1" units="in" inkscape:document-units="in" />'# Import Libraries
import os
import svgpathtools# Get a list of all the .svg files in current working directory
cwd = os.getcwd()
svg_file_list = []
for file in os.listdir(cwd):
    if file.endswith(".svg"):
        svg_file_list.append(file)    # Ensure .svg was created by Shaper Origin Utilities
    if "shaper:fusionaddin" not in svg_file_attributes:
        print(f'{svg_file} was not created by Shaper Utilities, file skipped.')
        breakFigure 6: svg_shaper_utility_to_glowforge.py Script Excerpt (Part 1)
The above excerpt defines the desired internal and external SVG path fill, stroke color, and stroke width before importing the required libraries. Next all SVG files in the current working directory are assigned to an array. The final section of code in Figure 6 checks that the SVG was created by the Shaper Utilities by looking for dictionary key shaper:fusionaddin in svg_file_attributes. This check ensures the shaper:pathType exists in the file and prevents the script from overwriting files that were not created by the Shaper Utilities.
# Parse .svg file then update colors and groups
for svg_file in svg_file_list:
    path_list, path_attribute_list, svg_file_attributes = svgpathtools.svg2paths2(svg_file)

    # Create two lists used to group paths when writing .svg file
    exterior_group_list = []
    interior_group_list = []

    # Loop through each path and edit attributes
    for path_dic in path_attribute_list:
        # Update exterior paths attributes and add them to list exterior_group
        if path_dic["shaper:pathType"] == "exterior":
            path_dic["fill"] = exterior_fill_color
            path_dic["stroke"] = exterior_stroke_color
            path_dic["stroke-width"] = exterior_stroke_width
            exterior_group_list.append(path_dic)
        # Update exterior paths attributes and add them to list interior_group
        elif path_dic["shaper:pathType"] == "interior":
            path_dic["fill"] = interior_fill_color
            path_dic["stroke"] = interior_stroke_color
            path_dic["stroke-width"] = interior_stroke_width
            interior_group_list.append(path_dic)Figure 7: svg_shaper_utility_to_glowforge.py Script Excerpt (Part 2)
At this point a for loop is created to loop through all the SVG files previously pulled. Each SVG file is read into the variables path_list, path_attribute_list, and svg_file_attributes using the svgpathtools library. The path_attribute_list is now an array of dictionaries with each element in the array representing a single path and each key in the dictionary representing a SVG tag such as stroke or fill.
Next an empty array for both the external and internal paths are initialized for use in a subsequent for loop and the final grouping of paths. From here the code loops through each path, looking at the shaper:pathType key to decide if the path is an external or internal path. Based on the type of path the stroke, fill, and stroke-witdth are updated to the desired values before adding the path dictionary into the appropriate group array.
# Write modified svg file
    output = open(svg_file, "w")
    # Write boiler plate information
    output.write('<?xml version="1.0" encoding="UTF-8" standalone="no"?>' + '\n')
    # Write svg file attribute data
    output.write('<svg' + '\n')
    for key in svg_file_attributes:
        output.write('\t' + key + '="' + svg_file_attributes[key] + '"\n')
    output.write('\t' + '>' + '\n')
    # Write inkscape preferences if they exist
    if inkscape_preferences:
        output.write('\t'+ inkscape_preferences + '\n')
    # Write path data for exterior group
    output.write('\t' + '<g>' + '\n')
    for path_dic in exterior_group_list:
        output.write('\t\t' + '<path ')
        for path_key in path_dic:
            output.write(path_key + '="' + path_dic[path_key] + '" ')
        output.write('/>' + '\n')
    # Write path data for interior group
    output.write('\t\t' + '<g>' + '\n')
    for path_dic in interior_group_list:
        output.write('\t\t\t' + '<path ')
        for path_key in path_dic:
            output.write(path_key + '="' + path_dic[path_key] + '" ')
        output.write('/>' + '\n')
    # Close groups and file
    output.write('\t\t' + '</g>'+ '\n')
    output.write('\t' + '</g>'+ '\n')
    output.write('</svg>')
    output.close()Figure 8: svg_shaper_utility_to_glowforge.py Script Excerpt (Part 3)
Next the script creates a new file, overwriting the existing SVG. The boilerplate information such including the overall file attributes and inkscape preferences are written. Then the the first group tag <g> is added before writing the external path data. A another group tag is placed followed by all internal path data. Finally, all the group tags are closed in addition to the closing SVG tag. The file is closed and the script moves back to the top of the for loop started in Figure 7 until all SVG files in the current directory have been parsed.
Boom, now instead of spending five minutes manually updating each SVG file, you can run this script on all the SVG files in the current directory in seconds. You can find the complete script and example SVG files on my GitHub. With that its laser time!

Script Source: GitHub